If you or your client has an SSL certificate purchased through GoDaddy but you need to install it on Siteground, follow the steps below.
Here are the steps to install your GoDaddy SSL certificate on your website at Siteground:
- Download and install PuTTY with Pageant (if you don’t have it already). Windows users will probably need the 64bit x86.
- Follow the instructions to generate a CSR found at https://www.siteground.com/kb/how_to_generate_a_csr/. I recommend uploading the config.txt file to the site root so it is easy to get to. You can do that using the cpanel File Manager or using ftp.
- When you get to the step that says ‘Save the changes and access your account via SSH’, follow the steps here https://www.siteground.com/tutorials/ssh/putty/
- NOTE: When you get to the last step on the page, enter the long username assigned under your key’s SSH Credentials found in the kabob menu (not the name you gave the key when created). If you copied the username onto your clipboard, right click into the PuTTY window and it will paste into the window. Then click Enter.
- If you did it right (yea!) you will now see ‘authenticating with public key “yourkeyname” etc and your domain name along with some server information. If you did it wrong, don’t despair! If the session timed out, I advise you to copy your username from your SSH Credentials into your clipboard so you can have it at the ready. Then right click it into the PuTTY window when asked to log in. And make sure you loaded your private key (the ppk file that you should have saved somewhere on your computer in Step 3) into Pageant. You have to do that each time you start a new session.
- Next, into the PuTTY window, type cd ~ (the tilde character) and click Enter .
- Next type ls (that’s a lowercase LS for the list command) and Enter. You should see a row of directories in your hosting account root. You can enter any directory you see by typing cd directory-name and click Enter. In this particular case, my site was in the www directory. So I typed cd www and Enter. Again I entered ls to view directories available to me. I saw my domain name directory. Let’s call it example.com. So I entered cd example.com and Enter. Then I was in the root of my site. For a wordpress site, this is where your wp-config file is. And, if you followed my advice above, it is where your newly created config.txt is as well. If not, continue your journey into directories until you reach the one holding your config.txt file.
- At this point, you can pick up where you were above in creating your CSR. So copy this command and right click to paste it into the PuTTY window and click Enter.
openssl req -new -out certificate.csr -newkey rsa:2048 -nodes -sha256 -keyout certificate.key -config config.txt - This created two files in your site root directory
- certificate.csr – Certificate Signing Request you will take to Godaddy
- certificate.key – the Private Key that you will need during the installation of the SSL certificate on Siteground.
- Download these files to your local computer and delete them from your server.
- Open the certficate.csr file and copy the contents onto your clipboard. Use a simple editor like Notepad or Notepad++ that won’t add formatting to the text. Don’t use a word processor like Word.
- Log into your Godaddy account and go to SSL Certificates > Manage All. Select the certificate that matches the domain name on Siteground
- Under Manage Certificate > Re-Key Certificate There is a box where you will now paste the contents of the CSR. Click Add Change then click Submit All Changes.
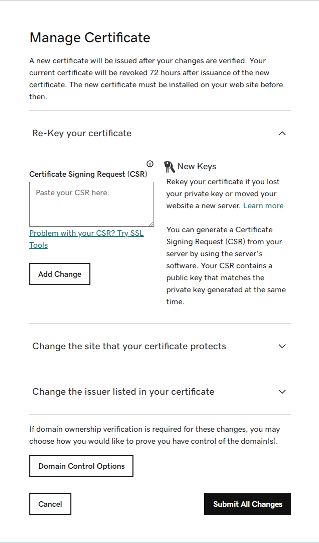
- You should receive a message telling you that your request will be reviewed and, if approved, your certificate will be rekeyed. It took about two hours if I recall correctly. (See updated info below….)
- Once your certificate is rekeyed, you can download a zip file on the same page where you rekeyed the certificate (under SSL Certificates>Manage All > your certificate). For shared hosting at Siteground you are most likely going to download the Apache server type.
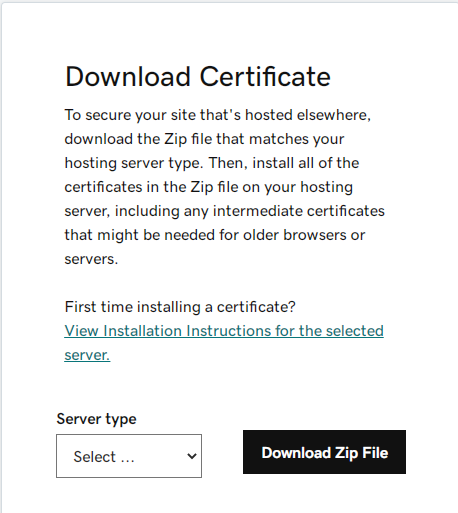
- Extract the zip file locally. You will need the crt and the bundle file.
- You are now ready to add the certificate to your Siteground site. You are also probably ready for a beer.
- Follow the instructions here: https://www.siteground.com/kb/install_third_party_ssl/
- The CRT and Bundle come from the GoDaddy files you unzipped.
- The Private key comes from the certificate.key file you created with PuTTY.
- Once you are successful in transferring your SSL certificate from GoDaddy to Siteground, you should delete the files you created (especially the private key).
UPDATED NOTE: The last time I went through this process, I was setting up a cert for the first time (not a renewal). So from the GoDaddy SSL Manage page, I clicked Setup. Then I entered the domain name (example.com) and was provided two files to download before shown a window to paste the CSR. However, Godaddy rejected it saying The Subject Alternative Name cannot be present. Please check and try again. What? So I exited the process to see if maybe the new cert was different from the others in that it did not cover alternate names. I did some research and decided to try one more time before going through the process at Siteground only no Alt names. This time, Godaddy listed my SSL as a Pending request instead of Setup so I clicked it and was taken to the familar dashboard where I could paste the CSR (among other things). And the CSR was accepted and the promised zip file was available immediately.
Contact Us with questions.